The output module should be viewed as an accumulation of a whole WaterMarque session. You have located, displayed and analysed various layers of data and perhaps associated the occurrence of one data type with another. The next logical step then is to create a graphics file that can be converted to hardcopy.
The output module is designed specifically to produce a graphics file in a format from which it can be plotted by any ARC/INFO supported device. Selections of feature overlays, attribute points and line features can all be placed into the graphics file. WaterMarque produces a graphics file (.gra) which can be converted to either a Raster Transfer Language (RTL) or Postscript format. WaterMarque creates the files in the directory /wmusr/username/plot.
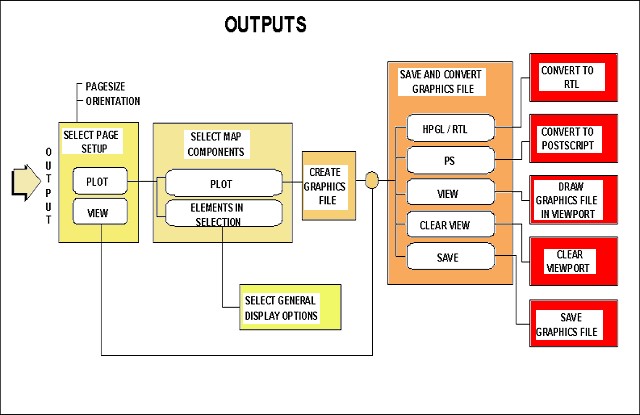
The output module menus are designed with some continuity. All menus have a Quit icon allowing you to opt out of the menu should you have made a mistake in selecting it. In addition, some of the menus have a Plot icon. This icon takes you to the Graphics Files to Save/View menu.
The View icon allows you to view a graphics file in the right-hand margin of the map area. If you would like to view one file after the other, simply click on the View icon after you have highlighted a new file name in the scroll box. The view of the new graphics file will replace the old view.
The View icon is associated with the Clear View icon in the Graphics files to save/view menu. The Clear View allows you to clear the view area of the map on screen once you have finished viewing a single or multiple set of maps.
The Save icon allows you to create the graphics file which is a selection of the elements selected in your session, entirely according to your requirements.
Click on the Output Generation icon on the Main menu bar at the lower left-hand side of the screen. The Output device, plot size, orientation menu appears on the screen. This menu allows you to choose the map size for the graphics file to be created. You have the choice of a range of sizes from paper size A0 to A5. Below this menu you will find a line, Map Orientation. The map orientation in this version of WaterMarque is always landscape. Any rotations which you would like to perform must be performed in Arc, outside of the WaterMarque interface.
Having selected the options available click on the Plot or View icons at the base of the screen. If you wish to view your file then click on the View icon and refer to the introduction section of this Module.
If you selected the Plot icon, the next menu to appear will be the Select Elements to plot menu. This menu is structured to provide you with the final controls on the map production process. The menu consists of a number of check boxes which act as specific control switches. Each of these switches controls a particular feature of the map in the graphics file you are going to create. Should you wish a feature to be present in your graphics file, click on the relevant check box.
The Symbols Point, Area and Key options merit extra discussion: these options come from the data query module. The Symbols Point allows you to change the position in which the symbols are to be drawn if you have previously chosen to draw the symbols to the area at the side of the map. Similarly, if you have previously chosen to draw your symbols at the monitoring points, you may click on the Symbols Area check box and have your symbols drawn to the side of the map in a separate area.
The Symbols Key check box allows you to switch the symbols key on and off for the symbols you have chosen. The key is drawn in the space below the map.
![]() The same key is
used for both the Box Plots and the Box Plot Graphs. This version
of WaterMarque has no keys for either the Time Series or Radial
Timeseries symbols. The symbols can be scaled in order to ensure
that the textsize and the scale of the symbols remains constant.
Should you wish that any of the above items should appear on
screen, and in your final graphics file, simply click on the
check box to the right of these options.
The same key is
used for both the Box Plots and the Box Plot Graphs. This version
of WaterMarque has no keys for either the Time Series or Radial
Timeseries symbols. The symbols can be scaled in order to ensure
that the textsize and the scale of the symbols remains constant.
Should you wish that any of the above items should appear on
screen, and in your final graphics file, simply click on the
check box to the right of these options.
To alter the scale of the graphics file
Click on the Scale icon at the base of the menu.
The menu which will appear to screen will be the Set scale for Graphics File menu. The menu has the function of allowing you to select the scale of the map you want to create in the graphics file. You have the choice of selecting either:
A field is supplied here to allow you to input a scale which suits you. You do not have to execute a carriage return in order for WaterMarque to 'see' your input. Click on the Done icon.
You might not have remembered to click on a relevant general selection control switch check box in the data selection modules earlier on in your session. Going back to reselect or deselect them can become a tedious and time consuming process. To regulate the selection of these switches click on the Elements in Selection icon bar at the base of the menu.
The Elements in Selection menu will appear. This menu is an accumulation of every general control switch available and some of the more important specific control switches for every features and point selection menu which has them.
It includes an accumulative background shading option which selects background shading for the area which is being viewed.
The mechanics of using this menu are relatively easy to understand:
Let us assume that you ran a session and used every module available in WaterMarque to hone and select some core pieces of data. To speed up the selection process in the Features Selection Module you did not select the general control switches on any of the menus, only the relevant specific control switches. If you had, it would have meant waiting every time that you changed some selection or redrew your screen as WaterMarque reselected the data from its libraries and drew it all to screen.
By not switching on the general control switches, the session was much faster. All that had to be done was to select the specific control switches (those switches which regulate exactly what aspects or subsets of a general layer are to be selected e.g. Basaltic Lava) . If no specific control switches were selected in your session, you would be switching no layers of data on by clicking on the general control switch.
When you have completed checking your selection in theElements in selection menu click on the Done icon at the base of the menu. You may now choose to view the file you are wanting to create before you save it. Click on the Plot icon at the base of the menu. An information box containing "deciding what to plot" messages will appear to screen.
The next menu to appear is the Graphics files to save/view.
The menu is constructed of an input field, a scroll box and a number of icons.
The input field , "current map in selection", displays a graphics file name. The default name is plotmap.gra. The highlighting in the scroll box below will correspond to the name which appears in the input field. You can choose to change the name by clicking on the field and typing the name you want.
The scroll box contains the names of graphics files which have previously been saved in this menu. You can scroll through the file names and view a saved file before plotting, or you may delete the files by simply clicking on the appropriate icon.
The HPGL/RTL and PS icons to the right of the menu are for selecting the Hewlett Packard Graphics Language Raster Transfer Language or PostScript.
In creating a useful base map or one which will be reproduced a number of times you may wish to save a graphics file. This is simply done by clicking on the Save icon at the base of the menu. Be sure that the name you have selected for the file is one that is appropriate and is not duplicated in the Plot menu. The formats present are all supported by ARC/INFO.
You also have the option of deleting any of the files in your /plot directory that you have write access to. To minimise the risk of accidental file deletion, WaterMarque will query your choice before the file is deleted.