
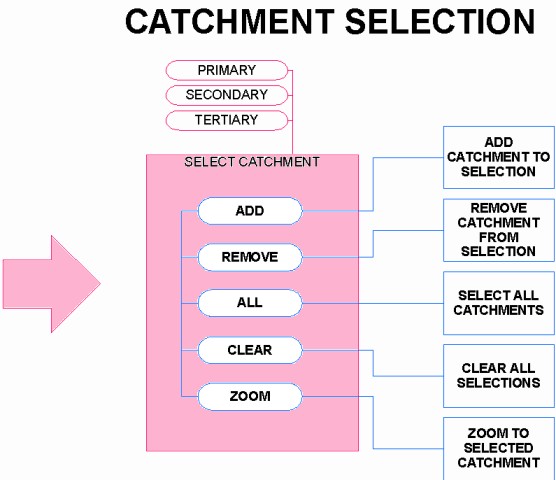
WaterMarque is primarily designed to provide information on water quality data at the catchment level. The catchments can be selected at either tertiary or primary level.
Generally, the first task in WaterMarque is to identify the catchment or catchments of interest for the remainder of the session. But remember that the modules can be strung together in any order, and you need not restrict yourself to a logical, sequential order. During the session you may return to the catchment selection menu, and redefine the area of interest once the data has been assessed.
Selection settings allow you to define the selection method (point or area) and the selection feature (primary, secondary or tertiary catchments). In general, it is easier to select tertiary catchments immediately and then zoom in on them using the Zoom icon. This is found at the base of the menu. Point selection is often easier than area selection. Because of this, point selection is the default option.
The centre section of the menu allows you to select or remove catchments. The following icons are used here:
![]() allows you to select one or
add further catchments to your map, the cursor arrow becomes
a pair of crosshairs.
allows you to select one or
add further catchments to your map, the cursor arrow becomes
a pair of crosshairs.
![]() allows you to remove
catchment numbers from the scrollable list box.
allows you to remove
catchment numbers from the scrollable list box.
![]() clears all the catchment numbers from
the list box.
clears all the catchment numbers from
the list box.
![]() selects all the catchments in
the Republic of South Africa
selects all the catchments in
the Republic of South Africa
Selecting to display tertiary catchments before you have zoomed in on the primary catchment you would like to work in, may clutter your screen. This also makes the selection of the tertiary catchment more difficult. It is, therefore, recommended that you not do this until you have properly zoomed into the primary catchment.

To select a catchment ![]() After clicking on the Redefine catchment icon on
the Main menu bar, the Select Area of Interest menu
appears and the procedure is as follows :
After clicking on the Redefine catchment icon on
the Main menu bar, the Select Area of Interest menu
appears and the procedure is as follows :
Click on the primary catchment check box. Whether you choose to work on the primary, secondary or tertiary catchment areas depends entirely on you and the tasks you wish to perform. Whether you wish to select by point or area again depends on whether you want to work solely within a catchment or not.
Click on the Point Selection Method icon.
Click on the Add icon.
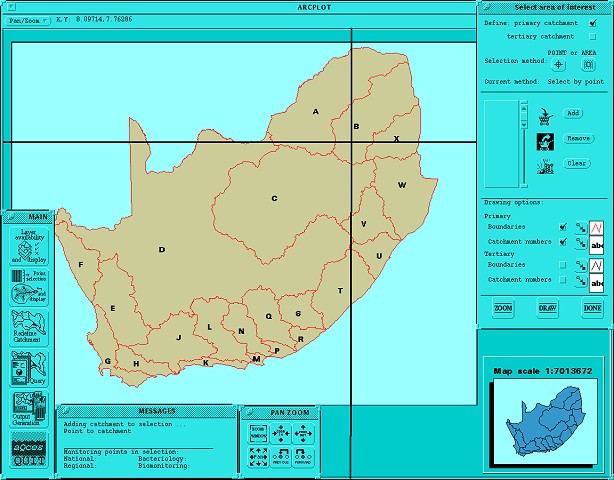
2a The main map showing the primary catchments and crosshairs
centred over the B catchment.
Move your cursor over the Main Mapping Area. Cross-hairs will appear as the cursor moves into the main mapping area. Click on the catchment you wish to select . The scroll box now contains the catchment number that you selected. During the selection stage the main screen will appear as follows :
Once the selection is complete and the catchment number appears in the selection list on the menu, click on the Zoom icon to zoom into the highlighted catchment.
You can now display other catchment boundaries and catchment numbers within the primary catchment. This is done by clicking on the check box to the right-hand side of the required catchment boundaries check box at the bottom of the menu.
Secondary and tertiary catchments are added in the same manner as primary catchments. Click on the Add icon and then onto the relevant catchment using the cross-hairs. To add multiple catchments merely repeat the process a number of times.
Alternatively, the area option may be used. Click on the Add by Area option on the menu and then click on the Add icon. When you move your pointer onto the Main Mapping area you will be expected to describe an area. This may include as many catchments as you wish.
 Should you select two or
catchments that are far apart, you may encounter difficulties
later on in your session. All monitoring points and attribute
data will be selected in accordance with the catchments
selected.
Should you select two or
catchments that are far apart, you may encounter difficulties
later on in your session. All monitoring points and attribute
data will be selected in accordance with the catchments
selected.
Once you have indicated that
you wish to select an area or a catchment you must do so.
There is no option allowing you to exit or escape from the
selection procedure. However, you may click on the sea and select
nothing. Should you find that you have selected an unwanted
catchment, either click on theReset to SA icon on the
Main menu bar, or use the Remove icon.
Clicking on the border
between two adjacent catchments or tertiary catchments selects
them both.
As you select additional catchments to the scroll box, the catchment most recently selected is highlighted. This display allows you to pick up any mistakes immediately.
Of course, you can select a tertiary catchment straight away by clicking on the tertiary options in the Select area of interest menu.
The removal of a catchment is much the same process, except that you click on the Remove icon and then on the catchment to be removed. WaterMarque redraws the main display to reflect the current catchment selection.
On completion of the selection procedure, zoom in on the current selection.
Redraw the screen if you want to select a different area.
or ,
Quit the menu and carry on to monitoring point selection and water quality data display via the main menu options.