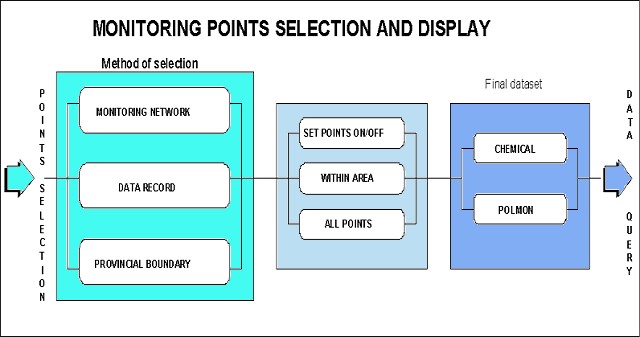
Water quality monitoring points can be selected in four ways :

![]() To select monitoring points, click on
the Point selection and display icon on the Main menu
bar.
To select monitoring points, click on
the Point selection and display icon on the Main menu
bar.
The Method of selection menu appears in the upper right-hand corner of the screen...

![]() Click on the top button to the right-hand
side of the Monitoring Network option. The Monitoring
points menu will appear.
Click on the top button to the right-hand
side of the Monitoring Network option. The Monitoring
points menu will appear.
Click on the Switch Monitoring Points On check box at the top of the menu. You can now choose if you want to display the points :
Below this section of the menu are the numerous monitoring networks from which you can choose. Monitoring networks are stored as point features and are displayed as small square features on the screen. Their colour is dependent on the monitoring network they belong to and the colours for these are not fixed. If you attempt to select more than one monitoring network or more than one aspect of the monitoring network, your previous choices will be deselected. WaterMarque changes the points on screen as you select networks. For example, clicking first on the All option under the National Monitoring Network option will bring a large number of monitoring network points to screen. Should you now select the stream monitoring points (i.e. a subset within National), the points on screen will disappear. Those points from your first selection that are National Stream Monitoring points, will be represented by red points, as the default colour.
The monitoring networks available are:
National :
Regional (POLMON):
Some other possible monitoring networks are:
but these monitoring networks are not implemented in this version of WaterMarque.
To further refine your selection use the following
buttons:
One -allows the user to select one monitoring station
from the dis play screen
Many -allows the user to select many monitoring stations from
the dis play screen. Press 9 to quit.
Box -allows the user to select monitoring stations within an
extent b y indicating the corners of a box on the display screen
Station number -allows the user to pick a station number from
a scrol ling list in a menu
Reset -resets the selection set to the setting on the
menu
The Selected stations scrolling list contains the station numbers of the currently selected monitoring stations.
Once you have selected the monitoring network you wish to
assess, click on the Done icon at the bottom of the
screen. ![]() A single
monitoring station, particularly a National monitoring station,
is often used to monitor several different characteristics of
water quality. Thus, if you select the different options in turn
in this menu, you will see the same point on the map change
colour to indicate that the different characteristics are being
monitored at the same point.
A single
monitoring station, particularly a National monitoring station,
is often used to monitor several different characteristics of
water quality. Thus, if you select the different options in turn
in this menu, you will see the same point on the map change
colour to indicate that the different characteristics are being
monitored at the same point.
The next menu to appear to screen is the Final Dataset menu.

![]() Click on the Data Record icon on
the Method of Selection menu. Activate the Method of
Selection menu through the Point selection and display
icon on the Main menu bar.
Click on the Data Record icon on
the Method of Selection menu. Activate the Method of
Selection menu through the Point selection and display
icon on the Main menu bar.
Then click on the Data Record icon. The Data Record menu will appear in the upper right-hand corner. To select monitoring points based on data records:
Click on the check box to the right of the Set monitoring points on option.
Select either :
by clicking on the relevant check box following your choice.
Select your points by data type.
In this you have a choice of:
Table 1. Substances or characteristics monitored (shaded items not available in WaterMarque)
| Categories of substances or characteristics monitored | Examples of some of the water quality variables measured in each category |
|---|---|
| Inorganic chemicals | Ammonia Boron Calcium Chloride |
| Trace metals | Aluminium Antimony Arsenic Barium |
| Organic substances | Biomass mg/l Chlorophyll a microgram/l Phaeophytin microgram/l |
| Trihalomethanes | Bromoform Chloroform Dibromochloromethane |
| Biomonitoring | ASPT - Average score per taxon DO - Dissolved oxygen HQI - Habitat quality index |
| Habitat diversity | Bank erosion potential Bank vegetative stability Bottom scouring and depth |
| Algal identification | Chlorophyta - Actinastrum Chlorophyta - Ankistrodesmus Chlorophyta - Carteria |
| Invertebrates | Annelida - Hirudinea Annelida - Oligochaeta Coelenterata - Hydra spp |
| Bacteriology | Enteric coliforms Faecal coliforms Faecal streptococci |
| Flow | Daily flow in cumecs Maximum monthly flow Mean monthly flow |
| POLMON | Alkalinity - total Aluminium - dissolved Aluminium - suspended Aluminium - total |
Your selection of the dataset will be determined by your purposes and tasks. As you select the points by data type you will notice that the scroll box at the bottom of the screen is continually updated.
Look at the Set data record per point options section of the the menu. Do you want :
To further refine your selection use the following
buttons:
One -allows the user to select one monitoring station
from the dis play screen
Many -allows the user to select many monitoring stations from
the dis play screen. Press 9 to quit.
Box -allows the user to select monitoring stations within an
extent b y indicating the corners of a box on the display screen
Station number -allows the user to pick a station number from
a scrol ling list in a menu
Reset -resets the selection set to the setting on the
menu
The Selected stations scrolling list contains the station numbers of the currently selected monitoring stations.
![]() In the present
version of WaterMarque, only one monitoring network dataset can
be assessed with at once, although several variables within a
particular dataset category may be processed simultaneously.
In the present
version of WaterMarque, only one monitoring network dataset can
be assessed with at once, although several variables within a
particular dataset category may be processed simultaneously.
If you wish to interrogate the regional (POLMON) monitoring networks further, select the POLMON in more detail menu. Different menus will appear with a similar format to the data record menu, which you can switch between.
Finally, if you are satisfied with your selection, click on the Done icon. The Final Dataset menu will appear.
![]() POLMON figures are
available for all regions.
POLMON figures are
available for all regions.
If you are dissatisfied with your selection, click on the Draw icon which will clear all data selected here and you can start again.
![]() Click on the Provincial Boundaries
icon on the Method of Selection menu. Activate the
Method of Selection menu through the Point selection and
display icon on the Main menu bar.
Click on the Provincial Boundaries
icon on the Method of Selection menu. Activate the
Method of Selection menu through the Point selection and
display icon on the Main menu bar.
The Provincial Boundaries menu appears on the screen.
To select monitoring points within Provincial Boundaries:
Click on the check box to the right of the Set Monitoring Points on option.
Select either :
by clicking on the relevant check box following your choice.
Select the Province for which you want data displayed, either:
To further refine your selection use the following
buttons:
One -allows the user to select one monitoring station
from the dis play screen
Many -allows the user to select many monitoring stations from
the dis play screen. Press 9 to quit.
Box -allows the user to select monitoring stations within an
extent b y indicating the corners of a box on the display screen
Station number -allows the user to pick a station number from
a scrol ling list in a menu
Reset -resets the selection set to the setting on the
menu
The Selected stations scrolling list contains the station numbers of the currently selected monitoring stations.
![]() In the present
version of WaterMarque, only one dataset category can be dealt
with at once, although several variables within a particular
dataset category may be processed simultaneously.
In the present
version of WaterMarque, only one dataset category can be dealt
with at once, although several variables within a particular
dataset category may be processed simultaneously.
Not implemented (restructuring of DWAF was taking place) - 1997-03-01 -
go back to the relevant monitoring networks to do so.
To select the current selection for any of these datasets, click on the check box following the current selection option in the relevant dataset. You cannot select more than one dataset.
If satisfied with your selection, click on the Done icon
If dissatisfied, click on the Resel(reselect) icon and start again.
![]() The selection
sets created from one method of selection will not be kept when
switching to another method of selection.
The selection
sets created from one method of selection will not be kept when
switching to another method of selection.
If you click on the Done icon, the Final Dataset
menu will appear. The user can now verify to either use the
inorganic selection set or POLMON selection set to continue.
The following menu is the first menu of the Data Query module. All following menus will be discussed fully in the next chapter even though they can be accessed through the Monitoring Points selection and display module, as well as the selection of Data query icon on the Main menu bar.